See Allan Martin interviewed about CACMC
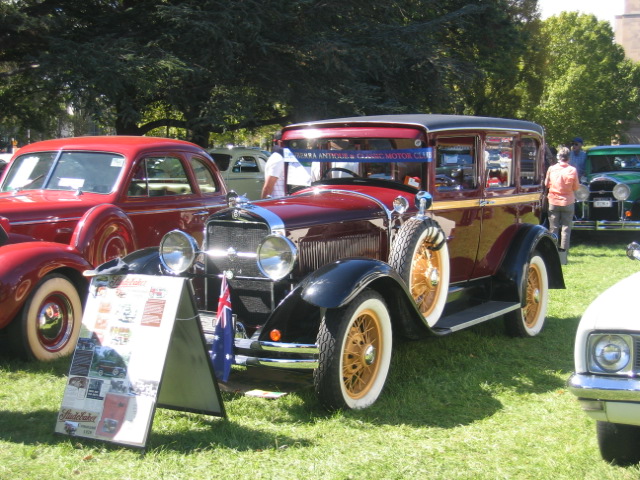
Last year on the club’s trip to the Binalong Motor Museum, I recall saying to Chris Berry and Charlie Adams that I would like classy restored earlier model car. In December’s Just Cars issue I found the 1928 Studebaker Commander Regal sedan for sale and in January this year Charlie Adams and myself visited the Sapphire Coast Historic Vehicle Club and after an inspection of the car and a run in the car to the club’s property at Pambula, I purchased the car from Tony Stove who is the President of their club and managed the total restoration. Tony kindly delivered the car to Canberra and agreed to provide the following very interesting and thorough restoration report of the Studebaker. As everyone knows there is always further restoration and improvements to be undertaken and I have received and fitted from Barry Boyce a nice black trunk for the rear rack, resealed the pinion oil seal, repainted the engine, prepared a two sided stand alone information A-framed display board of Studebaker information, fixed small signage and I am in the process of fixing a stainless steel or chrome grille in front of the radiator. This car was displayed at ”Wheels” this year and will be presented at further car shows in the future.
I am indebted to Tony for the following very interesting restoration report.
Cheers, Alan Martin
=======================================
Tony Stove writes:
Part of my planned retirement , once my wife and I had settled at Merimbula, was to take on another vintage vehicle restoration project. Previously I had completed 100% restorations on a 1925 Morris Cowley Roadster and a 1927 Oakland Tourer, so it was obvious I had to take on a sedan. And a classic at that; none of these common “dime a dozen” Chevs, Dodges and Fords! Further, I wanted to again take on a challenge, a full restoration, when on completion, I would know every nut and bolt of the vehicle. It took over two years to find the “right” vehicle that met my objectives. It was a 1928 Studebaker Commander “Regal”. Whilst there were a few standard Commander models of that era in Australia, there were only two known “Regals”, the upmarket version of the Commander.
The Studebaker was located in Cootamundra, and I first heard of it when my wife and I were on a caravan trip in far north Queensland when we met up with a historic vehicle enthusiast from Wagga. A couple of months later I went to Cootamundra to look at the Studebaker. Yes it was a wreck; timber frame rotted, a tree had fallen through the left rear of the car, but there was no rust, and basically it was complete through mostly dismantled- a restoration planned some 20 years earlier that never really got started. The registration label fixed to the windscreen indicated it was last registered in 1953. And there was a bonus, a partial wreck of a standard model Commander with a complete drive train. So I purchased the lot in December 2002 and in February 2003 all this was hauled over the Great Divide on two trips to the Sapphire Coast Historic Vehicle Club’s workshop at South Pambula.
For the next four months nothing much happened. I needed to “get my head around’ what was in store. But in June what was left of the Studebaker was slowly dismantled, panels, assemblies and parts assessed, documented and stored. Having completed two previous restorations I knew what was involved, established priorities, and drafted some semblance of a flow chart. Unless otherwise stated, all work was undertaken in the SCHVC workshop at South Pambula.
The chassis was sandblasted, primed and painted. I had two engines, both in reasonable condition but needing total rebuilt. For the integrity of the vehicle I decided to go with the original motor and this was rebuilt by Don Jewell at Dandenong Rebores in Melbourne. Block was re-sleeved, new alloy pistons fitted, new bearings machined, crankshaft balanced, camshaft ground, new valves and so on. Studebaker called these motors the “Big 6”, and with a 3¨þ in bore the 353.8 cu in motor, it’s “big”. The gearbox was complete but all the gears were badly worn, very noisy, so at great expense it was necessary to have all new gears machined. Again I turned to someone I had used previously, John Needham at Moorabbin in Melbourne. Hardy-Spicer checked out the tailshaft; needle bearings in the universals were good, and all that was necessary was the tailshaft to be balanced.
The diff posed a bit of a problem. Before it found its way to Cootamundra in the late 70s, for about 12 years the car sat in a paddock, slowly sinking into mud on a property near Caragaball. During this period it was obvious water had seeped into the bottom section of the diff as about 6-7 teeth on the crown wheel were pitted. As the “deal” came with a part wreck of another Studebaker, that diff was in good condition, albeit a 3:35 ratio whereas the original had a 3:75 ratio diff. This came to haunt me later. So the better diff had all new bearings fitted, lapped and installed. The two main outer rear wheel bearings were replaced with new bearings. The original diff was left amongst all the spare parts. Front and rear springs were re-tempered, but before I could fit them to the chassis, new shackle pins needed to be machined, and suitable replacement bearings found because the Studebaker is fitted with Fafnir shackle pins. The new pins were machined on big lathe at the SCHVC Workshop and in the end I finished up with a nice tight fit of pin and bearings in each main leaf spring. In hindsight, an easier solution would have been nylon inserts but with bearings, it’s original.
Now for the body frame. Almost all the original Beech timber frame had deteriorated, in fact some pieces were missing so we had to draw templates, make jigs from what was salvaged, and whatever was missing we shaped from the body panels. The new frame was made from Victorian Ash (naturally died) and obtained from North Eden Timbers. Most of the work was done by SCHVC member and retired builder, Keith McCormack with me as his “apprentice”. The roof section, over the 14 roof struts, was covered with marine ply to give added strength to the frame. The framework was a slow job and working off and on, took us almost 6 months. Prior to working on my Studebaker, Keith had completed the frame for a 1929 Peerless, also in the SCHVC workshop.
The doors, mudguards, scuttle section and bonnet were in reasonable shape; some superficial rust, minor cracks and dents, but straight forward repairs. The rear tub proved to be headache as it would seem a large tree branch had fallen on the left rear section so it took days of panel beating to get it right (I loathe “bog”, so it had to be right). Eventually all the metal was primed and positioned on the timber frame for test fit, and overall it all came together better than I expected. New valances were fitted as the originals had rusted along the top (between the timber frame and chassis), which is quite common with vintage cars. It was now May 2005 and at this stage the restoration had been in progress for two years.
Next task was the doors. Window winder and lock mechanisms were de-rusted in molasses then repaired. New Bailey channelling fitted to all doors and the two rear quarter windows (they also have windup windows). All new glass was fitted and the original windscreen was replaced by laminated glass. Interestingly, despite its age, and having sat in a paddock for 12 years or so, the original glass was complete (good for templates), save a small piece missing from the driver’s window. I should mention that the channelling and glass was not fitted in the doors and windows till after final painting.
Front axle assembly was sandblasted, primed and new kingpins fitted. Likewise, new ball joints were fitted to all the steering joints. The brakes were relined, hubs honed, then individually matched by Henry Lucas in Pambula. He was adamant that I retain the matched hubs and brake shoes when finally fitted to the car. His work was brilliant. One of the drawbacks with this model Commander is that it has mechanical brakes. For a car of its size and weight they are not the best and a headache to keep all four wheels correctly adjusted. In 1929 Commanders were fitted with hydraulic brakes. I did consider converting to hydraulic brakes, and best option would be find a set and master cylinder from a President model. That turned up nothing so I retained the mechanicals with a view to perhaps later converting to hydraulics.
The original honeycomb radiator core was a write-off, so I took the easy option by salvaging the top and bottom tanks and fitted them to a new core. I had no shortage of spare parts and assemblies so didn’t have to spend time chasing items at swap meets and on the internet. For example I had 11 wire spoke wheels in good condition, so I picked out the best six, they were sandblasted and painted by powder-coating at Caraghers in Bega. For wire spoke wheels I have found powder-coating is a better option than spray painting.
I had no shortage of instruments; at least two of each, so I selected the best and sent them to Gary Haddow in Melbourne
to be cleaned, repaired and calibrated. Gary also provided a new sensor and sender for the temperature gauge. Whilst I had the original speedometer housing (minus cable), Flexdrive in Melbourne made a new speedometer housing and cable. This model Commander was factory fitted with either a Ball & Ball or Stromberg 1½ inch updraft carburettor. I had neither and in fact this was the only assembly missing. However, in my collection I found a almost complete 1½ inch Tillotson I had picked up at the Bendigo Swap Meet back in the mid 80s. So I sent it down to John Cheal at Wilson Carburettors in Melbourne, and in no time he returned a fully reconditioned carburettor. The Studebaker has a 16 Gallon fuel tank and an internal mirror inspection revealed lots of surface rust and I hit on a novel way to get rid of the rust. I fixed the tank to the bowl of a concrete mixer, tossed in a few handfuls of road metal, replaced the cap and let the mixer run for 24 hours. Made a “racket’, but did a great job!
All the brightwork (chrome) was handled by Albury Electroplaters; a family run business I first used in 1979 and they have also done work for many vehicles restorations for SCHVC members. For me they did the outer door handles (and a couple of spares), hubcaps (and spares), headlights, park lights, tail light surrounds, bonnet handles and catches, front and rear bumper bars, horn surround and levers, cowl surcingle, radiator cap and of course the radiator surround. The radiator surround needed a large dent repaired before chroming and I could not pick the repair when the job was completed. I only had a two each of the interior door handles and window winders, and they were damaged, but sufficient remained to get hold of new stainless steel replacements, and they were obtained from Glenn & Rosemary Smith at Vintage & Classic Reproductions in Brisbane.
After about 2½ years on the restoration it was time to paint the body. The primer and undercoats were done in the SCHVC Workshop and the final two-pack paint job was done by Neil Clements at his booth at Millingandi (just north of Pambula). “Rich Maroon” for the body with a “Sand” belt and black mudguards. This stage took four months, much longer than I had planned. Once back in the SCHVC Workshop, the already assembled motor and gearbox was fitted and tailshaft connected, fuel tank installed, steering column (less innards) mounted to the chassis along with pitman arm, and the rest of the steering components. SCHVC member Ray Boulton, installed all the electrical wiring circuits to lights, instruments and the motor. I decided to convert the vehicle to 12 volt with key ignition and that posed no problems whatsoever. Where the original vertically mounted 6 volt generator fitted at the front of the crankcase, was sealed with a new bracket to mount the alternator. As I had installed an electric fuel pump the crankcase mounting for the original fuel pump was also sealed. The fan hub was modified from the original which turned on a shaft in a oil bath with circulation done by a small internal two-wheel oil pump. Again on the SCHVC lathe we machined a new fan hub and fitted two sealed bearings; so simple. New radiator was fitted next (no leaks, great!).
So after almost three years this is how the restoration looked. Complete new timber frame on the chassis with primed body fitted (less doors and floor), front and rear axles fitted, radiator, motor and drive-train installed, exhaust and muffler connected to the manifold, electrical cabling in place and mostly connected, instruments installed, and steering installed and connected. For the past 18 months, for ease of movement, I had salvaged four old tyres from the two vehicles and fitted them the spare wheels. It was time to start the motor. Ignition on, let the fuel pump do its job for about 15 seconds, key over to the start position, and after only three or four revolutions of the motor, the Studebaker burst into life. It was sometime in April 2007.
Now was the incentive to push on with the restoration to completion. Flooring (Victorian Ash and plywood) was quite straightforward, through somewhat “fiddly” getting it right around the pedals and gearbox. Next job, the curved timber frame for the front seat rear was difficult; there were curves and angles, and it all had to fit snug against the metal backing for the seat. But again the SCHVC Workshop bandsaw helped me get it right. Under the front seat I fitted a storage area for “essentials”. Next job was fitting the mudguards, rear first and problems making sure the piping between the body and guards fitted snug. Front mudguards on the Studebaker are pretty hefty, however they fitted well. Next were the doors; the first three went on and fitted so snugly I thought this was a “piece of cake”. Not so; left rear, closest to where that tree branch fell on the car some 40 or so years earlier, closed only with considerable force, but some slight re-shaping of the hinges mostly solved the problem. Bonnet fitted perfectly; amazing how just fitting the bonnet mad the car look so much more complete, and impressive. I fitted telescopic shock absorbers on the rear in lieu of the original lever arm style. For the front the steering geometry prevented this so I had the two original Delco front shockers refurbished and fitted them. The car was now at a stage to drive. I fitted a cut-down plastic garden seat to the front seat base and so it was off around the SCHVC five acre complex, which allowed for all the initial testing and adjustments. I must say it was a pleasure to drive and a realisation that three year restoration was nearing completion.
Then it was back to more electrical work. Along the way I had re-assembled the headlights after the reflectors had been re-chromed, so they were fitted to the front crossbar and connected to the electrical circuit. Parking lights, likewise assembled and fixed to the brackets that form part of the surcingle. I fitted left and right taillights, though the stop lights on each don’t show up too brightly because of the tin insert (between the outer glass and bulb), which has the name “Studebaker” stencilled, and though original it does limit the amount of light showing. The dash had all its chrome redone. I was pretty fussy about the style of the front and rear turn signal lights as I wanted them to closely match the shape of the head and tail lights respectively. In the Harley Davidson motor cycle catalogue I found just what I wanted.
Next task was the vinyl roof, something I had never tackled before. In place was three-ply marine ply over the roof ribs, some it seemed a fairly straight-forward job. First task was gluing ¼inch thick foam rubber on the ply. Over this I stretched black vinyl I obtained from Blackwoods in Melbourne (saw being fitted for a MGB roadster roof, and it looked good). The vinyl was held firmly stretched with ½inch aluminium moulding around the entire roof; just a bit tricky around the rear with the curves to match the roof line. The aluminium mouldings were the fixed firmly with counter-sunk stainless screws. Job done, all in just one day, and it looked good.
The car now ready for Club plates its roadworthy inspection and this was undertaken by one of the SCHVC registration officers; passed with no problems. So it was off to the Eden Branch of the RTA just 15 Km down the Princes Highway, and within an hour I had registered the Studebaker and fitted licence plates 33967H. The date was 21 August, 2007.
But there was still one more job to be done, the complete interior trim, headlining door trim, seat and carpet. As new, Studebaker used the name mohair for the trim and in today’s parlance the equivalent is velour. For this work I had Mick Stevens in Melbourne do the job. I had used him before, his quality of workmanship was excellent, and that’s all I would accept for this classy vehicle. As the plan was to drive the Studebaker to Melbourne (almost 600Km), I had to be sure it was running well as was virtually a new vehicle. Mick was not able to start on the trim till September (2007), so I had a month to get a few miles up on the Studebaker. In fact I drove it for just over 300 miles in this period and with a few adjustments I was very happy with its performance. So off to Melbourne; departed around 6am and not pushing it over 50 mph arrived there around 3:00pm. Car ran very well, though a little noisy with no trim, carpets etc! A month later the Studebaker was ready for collection, so I took a flight to Melbourne to collect the car. I was delighted with what Mick Stevens had done; in fact the trim was magnificent and befitting of a classic vintage vehicle. I then drove the Studebaker back to Merimbula, the first hour through a torrential storm; not a drop of water inside, and the car didn’t miss a beat.
The first official Club run in which the Studebaker took part was a day trip up to Bombala to historic “Burnima” homestead. Over the next three and a half years the Studebaker take part in numerous Club and invitation events. In 2009 it won “Best Restoration” award at the NRMA Merimbula Motor Show, and later that year on the “Bay to Bermagui”, the People’s Choice Award, Historic Vehicle and Costume award, and was runner-up for the Best Rally Car. It has participated in the SCHVC 2008 “Gippsland-Ranges-Peninsulas” rally, and the 2010 “Roaming the Riverina” rally; both two-week events.
Since the restoration was completed, two major mechanical problems arose. The first, which wasn’t so much a problem but an improvement, was to have the original 3:75 ratio differential rebuilt and installed in lieu of the faster 3:39 ratio differential. This was a big improvement and cut out all that second gear work I found tiresome in hilly country. The second problem was water leaking into one and two cylinder bores, caused by a poorly made/ill-fitting cylinder head gasket and excessive corrosion of the water ports in the cylinder head. The latter my mistake and I should have picked this up during the restoration. Anyway the problem was easily fixed when I sourced a NOS head gasket from the USA, and had the spare cylinder head water ports re-metalled. Thereafter I had trouble-free and enjoyable motoring.
Of the three vehicles I have restored, the Studebaker was the most difficult and comprehensive, but most satisfying. It was a classic in its era, rare in Australia, much admired and brought me tremendous pleasure.
Tony Stove